Welcome to H2O 3
H2O is an open source, in-memory, distributed, fast, and scalable machine learning and predictive analytics platform that allows you to build machine learning models on big data and provides easy productionalization of those models in an enterprise environment.
H2O’s core code is written in Java. Inside H2O, a Distributed Key/Value store is used to access and reference data, models, objects, etc., across all nodes and machines. The algorithms are implemented on top of H2O’s distributed Map/Reduce framework and utilize the Java Fork/Join framework for multi-threading. The data is read in parallel and is distributed across the cluster and stored in memory in a columnar format in a compressed way. H2O’s data parser has built-in intelligence to guess the schema of the incoming dataset and supports data ingest from multiple sources in various formats.
H2O’s REST API allows access to all the capabilities of H2O from an external program or script via JSON over HTTP. The Rest API is used by H2O’s web interface (Flow UI), R binding (H2O-R), and Python binding (H2O-Python).
The speed, quality, ease-of-use, and model-deployment for the various cutting edge Supervised and Unsupervised algorithms like Deep Learning, Tree Ensembles, and GLRM make H2O a highly sought after API for big data data science.
Requirements
At a minimum, we recommend the following for compatibility with H2O:
- Operating Systems:
- Windows 7 or later
- OS X 10.9 or later
- Ubuntu 12.04
- RHEL/CentOS 6 or later
- Languages: Scala, R, and Python are not required to use H2O unless you want to use H2O in those environments, but Java is always required. Supported versions include:
- Java 7 or later. Note: Java 9 is not yet released and is not currently supported.
- To build H2O or run H2O tests, the 64-bit JDK is required.
- To run the H2O binary using either the command line, R, or Python packages, only 64-bit JRE is required.
- Both of these are available on the Java download page.
- Scala 2.10 or later
- R version 3 or later
- Python 2.7.x or 3.5.x
- Java 7 or later. Note: Java 9 is not yet released and is not currently supported.
- Browser: An internet browser is required to use H2O’s web UI, Flow. Supported versions include the latest version of Chrome, Firefox, Safari, or Internet Explorer.
Additional Requirements
- Hadoop: Hadoop is not required to run H2O unless you want to deploy H2O on a Hadoop cluster. Supported versions are listed on the Download page (when you select the Install on Hadoop tab) and include:
- Cloudera CDH 5.2 or later (5.3 is recommended)
- Hortonworks HDP 2.1 or later
Refer to the Hadoop Users section for detailed information.
- Conda 2.7 or 3.5 repo: Conda is not required to run H2O unless you want to run H2O on the Anaconda Cloud. Refer to the Anaconda Cloud Users section for more information.
- Spark: Version 1.6 or 2.0. Spark is only required if you want to run Sparkling Water.
New Users
If you’re just getting started with H2O, here are some links to help you learn more:
Downloads page: First things first - download a copy of H2O here by selecting a build under “Download H2O” (the “Bleeding Edge” build contains the latest changes, while the latest alpha release is a more stable build), then use the installation instruction tabs to install H2O on your client of choice (standalone, R, Python, Hadoop, or Maven).
For first-time users, we recommend downloading the latest alpha release and the default standalone option (the first tab) as the installation method. Make sure to install Java if it is not already installed.
Tutorials: To see a step-by-step example of our algorithms in action, select a model type from the following list:
Using Flow - H2O’s Web UI: This section describes our new intuitive web interface, Flow. This interface is similar to IPython notebooks, and allows you to create a visual workflow to share with others.
Launch from the command line: This document describes some of the additional options that you can configure when launching H2O (for example, to specify a different directory for saved Flow data, to allocate more memory, or to use a flatfile for quick configuration of a cluster).
Algorithms: This section describes the science behind our algorithms and provides a detailed, per-algo view of each model type.
GitHub Help: The GitHub Help system is a useful resource for becoming familiar with Git.
New User Quick Start
New users can follow the steps below to quickly get up and running with H2O directly from the h2o-3 repository. These steps guide you through cloning the repository, starting H2O, and importing a dataset. Once you’re up and running, you’ll be better able to follow examples included within this user guide.
- In a terminal window, create a folder for the H2O repository. The example below creates a folder called “repos” on the desktop.
user$ mkdir ~/Desktop/repos
- Change directories to that new folder, and then clone the repository. Notice that the prompt changes when you change directories.
user$ cd ~/Desktop/repos
repos user$ git clone https://github.com/h2oai/h2o-3.git
- After the repo is cloned, change directories to the h2o folder.
repos user$ cd h2o-3
h2o-3 user$
- Run the following command to retrieve sample datasets. These datasets are used throughout this User Guide and within the Booklets.
h2o-3 user$ ./gradlew syncSmalldata
At this point, determine whether you want to complete this quick start in either R or Python, and run the corresponding commands below from either the R or Python tab.
# Download and install R:
# 1. Go to http://cran.r-project.org/mirrors.html.
# 2. Select your closest local mirror.
# 3. Select your operating system (Linux, OS X, or Windows).
# 4. Depending on your OS, download the appropriate file, along with any required packages.
# 5. When the download is complete, unzip the file and install.

# Start R
h2o-3 user$ r
...
Type 'demo()' for some demos, 'help()' for on-line help, or
'help.start()' for an HTML browser interface to help.
Type 'q()' to quit R.
>

# Copy and paste the following commands in R to download dependency packages.
> pkgs <- c("methods","statmod","stats","graphics","RCurl","jsonlite","tools","utils")
> for (pkg in pkgs) {if (! (pkg %in% rownames(installed.packages()))) { install.packages(pkg) }}

# Run the following command to load the H2O:
> library(h2o)

# Run the following command to initialize H2O on your local machine (single-node cluster) using all available CPUs.
> h2o.init()

# Import the Iris (with headers) dataset.
> path <- "smalldata/iris/iris_wheader.csv"
> iris <- h2o.importFile(path)

# View a summary of the imported dataset.
> print(iris)

  sepal_len    sepal_wid    petal_len    petal_wid        class
-----------  -----------  -----------  -----------  -----------
        5.1          3.5          1.4          0.2  Iris-setosa
        4.9          3            1.4          0.2  Iris-setosa
        4.7          3.2          1.3          0.2  Iris-setosa
        4.6          3.1          1.5          0.2  Iris-setosa
        5            3.6          1.4          0.2  Iris-setosa
        5.4          3.9          1.7          0.4  Iris-setosa
        4.6          3.4          1.4          0.3  Iris-setosa
        5            3.4          1.5          0.2  Iris-setosa
        4.4          2.9          1.4          0.2  Iris-setosa
        4.9          3.1          1.5          0.1  Iris-setosa
[150 rows x 5 columns]
>
# Before starting Python, run the following commands to install dependencies.
# Prepend these commands with `sudo` only if necessary.
h2o-3 user$ [sudo] pip install -U requests
h2o-3 user$ [sudo] pip install -U tabulate
h2o-3 user$ [sudo] pip install -U future
h2o-3 user$ [sudo] pip install -U six

# Start python
h2o-3 user$ python
>>>

# Run the following command to import the H2O module:
>>> import h2o

# Run the following command to initialize H2O on your local machine (single-node cluster).
>>> h2o.init()

# If desired, run the GLM, GBM, or Deep Learning demo
>>> h2o.demo("glm")
>>> h2o.demo("gbm")
>>> h2o.demo("deeplearning")

# Import the Iris (with headers) dataset.
>>> path = "smalldata/iris/iris_wheader.csv"
>>> iris = h2o.import_file(path=path)

# View a summary of the imported dataset.
>>> iris.summary
  sepal_len    sepal_wid    petal_len    petal_wid        class
-----------  -----------  -----------  -----------  -----------
        5.1          3.5          1.4          0.2  Iris-setosa
        4.9          3            1.4          0.2  Iris-setosa
        4.7          3.2          1.3          0.2  Iris-setosa
        4.6          3.1          1.5          0.2  Iris-setosa
        5            3.6          1.4          0.2  Iris-setosa
        5.4          3.9          1.7          0.4  Iris-setosa
        4.6          3.4          1.4          0.3  Iris-setosa
        5            3.4          1.5          0.2  Iris-setosa
        4.4          2.9          1.4          0.2  Iris-setosa
        4.9          3.1          1.5          0.1  Iris-setosa

[150 rows x 5 columns]
<bound method H2OFrame.summary of >
>>>
Experienced Users
If you’ve used previous versions of H2O, the following links will help guide you through the process of upgrading to H2O-3.
- Migrating to H2O 3: This section provides a comprehensive guide to assist users in upgrading to H2O 3.0. It gives an overview of the changes to the algorithms and the web UI introduced in this version and describes the benefits of upgrading for users of R, APIs, and Java.
- Recent Changes: This document describes the most recent changes in the latest build of H2O. It lists new features, enhancements (including changed parameter default values), and bug fixes for each release, organized by sub-categories such as Python, R, and Web UI.
- Contributing code: If you’re interested in contributing code to H2O, we appreciate your assistance! This document describes how to access our list of Jiras that are suggested tasks for contributors and how to contact us.
Flow Users
H2O Flow is a notebook-style open-source user interface for H2O. It is a web-based interactive environment that allows you to combine code execution, text, mathematics, plots, and rich media in a single document, similar to iPython Notebooks. An entire section dedicated to starting and using the features available in Flow is available later in this document.
Sparkling Water Users
Sparkling Water is a gradle project with the following submodules:
- Core: Implementation of H2OContext, H2ORDD, and all technical integration code
- Examples: Application, demos, examples
- ML: Implementation of MLlib pipelines for H2O algorithms
- Assembly: Creates “fatJar” composed of all other modules
- py: Implementation of (h2o) Python binding to Sparkling Water
The best way to get started is to modify the core module or create a new module, which extends a project.
Users of our Spark-compatible solution, Sparkling Water, should be aware that Sparkling Water is only supported with the latest version of H2O. For more information about Sparkling Water, refer to the following links.
Sparkling Water is versioned according to the Spark versioning, so make sure to use the Sparkling Water version that corresponds to the installed version of Spark.
Getting Started with Sparkling Water
- Download Sparkling Water: Go here to download Sparkling Water.
- Sparkling Water Development Documentation: Read this document first to get started with Sparkling Water.
- Launch on Hadoop and Import from HDFS: Go here to learn how to start Sparkling Water on Hadoop.
- Sparkling Water Tutorials: Go here for demos and examples.
- Sparkling Water K-means Tutorial: Go here to view a demo that uses Scala to create a K-means model.
- Sparkling Water GBM Tutorial: Go here to view a demo that uses Scala to create a GBM model.
- Sparkling Water on YARN: Follow these instructions to run Sparkling Water on a YARN cluster.
- Building Machine Learning Applications with Sparkling Water: This short tutorial describes project building and demonstrates the capabilities of Sparkling Water using Spark Shell to build a Deep Learning model.
- Sparkling Water FAQ: This FAQ provides answers to many common questions about Sparkling Water.
- Connecting RStudio to Sparkling Water: This illustrated tutorial describes how to use RStudio to connect to Sparkling Water.
Sparkling Water Blog Posts
Sparkling Water Meetup Slide Decks
PySparkling
Note: PySparkling requires Sparkling Water 1.6 or later.
H2O’s PySparkling package is not available through pip. (There is another similarly-named package.) H2O’s PySparkling package requires EasyInstall.
To install H2O’s PySparkling package, use the egg file included in the distribution.
- Download Spark 1.6.
- Set the
SPARK_HOMEandMASTERvariables as described on the Downloads page. - Download Sparkling Water 1.6
- In the unpacked Sparkling Water directory, run the following command:
easy_install --upgrade sparkling-water-1.6/py/dist/pySparkling-1.6-py2.7.egg
Python Users
Pythonistas will be glad to know that H2O now provides support for this popular programming language. Python users can also use H2O with IPython notebooks. For more information, refer to the following links.
- Instructions for using H2O with Python are available in the Downloading and Installing H2O section and on the H2O Download page. Select the version you want to install (latest stable release or nightly build), then click the Install in Python tab.
- Python docs: This document represents the definitive guide to using Python with H2O.
- Grid Search in Python: This notebook demonstrates the use of grid search in Python.
Anaconda Cloud Users
You can run H2O in an Anaconda Cloud environment. Conda 2.7 and 3.5 repos are supported as are a number of H2O versions. Refer to https://anaconda.org/h2oai/h2o/files to view a list of available H2O versions. Anaconda users can refer to the Install on Anaconda Cloud section for information about installing H2O in an Anaconda Cloud.
R Users
Currently, the only version of R that is known to be incompatible with H2O is R version 3.1.0 (codename “Spring Dance”). If you are using that version, we recommend upgrading the R version before using H2O.
To check which version of H2O is installed in R, use versions::installed.versions("h2o").
- R User Documentation: This document contains all commands in the H2O package for R, including examples and arguments. It represents the definitive guide to using H2O in R.
- Connecting RStudio to Sparkling Water: This illustrated tutorial describes how to use RStudio to connect to Sparkling Water.
Note: If you are running R on Linux, then you must install libcurl, which allows H2O to communicate with R. We also recommend disabling SElinux and any firewalls, at least initially until you have confirmed H2O can initialize.
- On Ubuntu, run:
apt-get install libcurl4-openssl-dev - On CentOs, run:
yum install libcurl-devel
API Users
API users will be happy to know that the APIs have been more thoroughly documented in the latest release of H2O and additional capabilities (such as exporting weights and biases for Deep Learning models) have been added.
REST APIs are generated immediately out of the code, allowing users to implement machine learning in many ways. For example, REST APIs could be used to call a model created by sensor data and to set up auto-alerts if the sensor data falls below a specified threshold.
- H2O 3 REST API Overview: This document describes how the REST API commands are used in H2O, versioning, experimental APIs, verbs, status codes, formats, schemas, payloads, metadata, and examples.
- REST API Reference: This document represents the definitive guide to the H2O REST API.
- REST API Schema Reference: This document represents the definitive guide to the H2O REST API schemas.
Java Users
For Java developers, the following resources will help you create your own custom app that uses H2O.
- H2O Core Java Developer Documentation: The definitive Java API guide for the core components of H2O.
- H2O Algos Java Developer Documentation: The definitive Java API guide for the algorithms used by H2O.
- h2o-genmodel (POJO/MOJO) Javadoc: Provides a step-by-step guide to creating and implementing POJOs or MOJOs in a Java application.
Developers
If you’re looking to use H2O to help you develop your own apps, the following links will provide helpful references.
For the latest version of IDEA IntelliJ, run ./gradlew idea, then click File > Open within IDEA. Select the .ipr file in the repository and click the Choose button.
For older versions of IDEA IntelliJ, run ./gradlew idea, then Import Project within IDEA and point it to the h2o-3 directory.
Note: This process will take longer, so we recommend using the first method if possible.
For JUnit tests to pass, you may need multiple H2O nodes. Create a “Run/Debug” configuration with the following parameters:
Type: Application
Main class: H2OApp
Use class path of module: h2o-app
After starting multiple “worker” node processes in addition to the JUnit test process, they will cloud up and run the multi-node JUnit tests.
- Developer Documentation: Detailed instructions on how to build and launch H2O, including how to clone the repository, how to pull from the repository, and how to install required dependencies.
- You can view instructions for using H2O with Maven on the Download page. Select the version of H2O you want to install (latest stable release or nightly build), then click the Use from Maven tab.
- Maven install: This page provides information on how to build a version of H2O that generates the correct IDE files.
- apps.h2o.ai: Apps.h2o.ai is designed to support application developers via events, networking opportunities, and a new, dedicated website comprising developer kits and technical specs, news, and product spotlights.
- H2O Droplet Project Templates: This page provides template info for projects created in Java, Scala, or Sparkling Water.
- H2O Scala API Developer Documentation for Scala 2.11 or Scala 2.10: The definitive Scala API guide for H2O.
- Hacking Algos: This blog post by Cliff walks you through building a new algorithm, using K-Means, Quantiles, and Grep as examples.
- KV Store Guide: Learn more about performance characteristics when implementing new algorithms.
- Contributing code: If you’re interested in contributing code to H2O, we appreciate your assistance! This document describes how to access our list of Jiras that contributors can work on and how to contact us. Note: To access this link, you must have an Atlassian account.
Hadoop Users
This section describes how to use H2O on Hadoop.
Supported Versions
- CDH 5.2
- CDH 5.3
- CDH 5.4
- CDH 5.5
- CDH 5.6
- CDH 5.7
- CDH 5.8
- HDP 2.1
- HDP 2.2
- HDP 2.3
- HDP 2.4
- HDP 2.5
- MapR 4.0
- MapR 5.0
- MapR 5.1
Important Points to Remember:
- The command used to launch H2O differs from previous versions. (Refer to the Walkthrough section.)
- Launching H2O on Hadoop requires at least 6 GB of memory
- Each H2O node runs as a mapper
- Run only one mapper per host
- There are no combiners or reducers
- Each H2O cluster must have a unique job name
-mapperXmx,-nodes, and-outputare required- Root permissions are not required - just unzip the H2O .zip file on any single node
Prerequisite: Open Communication Paths
H2O communicates using two communication paths. Verify these are open and available for use by H2O.
Path 1: mapper to driver
Optionally specify this port using the -driverport option in the hadoop jar command (see “Hadoop Launch Parameters” below). This port is opened on the driver host (the host where you entered the hadoop jar command). By default, this port is chosen randomly by the operating system. If you don’t want to specify an exact port but you still want to restrict the port to a certain range of ports, you can use the option -driverportrange.
Path 2: mapper to mapper
Optionally specify this port using the -baseport option in the hadoop jar command (refer to Hadoop Launch Parameters below. This port and the next subsequent port are opened on the mapper hosts (the Hadoop worker nodes) where the H2O mapper nodes are placed by the Resource Manager. By default, ports 54321 (TCP) and 54322 (TCP & UDP) are used.
The mapper port is adaptive: if 54321 and 54322 are not available, H2O will try 54323 and 54324 and so on. The mapper port is designed to be adaptive because sometimes if the YARN cluster is low on resources, YARN will place two H2O mappers for the same H2O cluster request on the same physical host. For this reason, we recommend opening a range of more than two ports (20 ports should be sufficient).
Walkthrough
The following steps show you how to download or build H2O with Hadoop and the parameters involved in launching H2O from the command line.
Download the latest H2O release for your version of Hadoop. Refer to the H2O on Hadoop tab of the download page for either the latest stable release or the nightly bleeding edge release.
Prepare the job input on the Hadoop Node by unzipping the build file and changing to the directory with the Hadoop and H2O’s driver jar files.
unzip h2o-{{project_version}}-*.zip
cd h2o-{{project_version}}-*
To launch H2O nodes and form a cluster on the Hadoop cluster, run:
hadoop jar h2odriver.jar -nodes 1 -mapperXmx 6g -output hdfsOutputDirName
The above command launches a 6g node of H2O. We recommend you launch the cluster with at least four times the memory of your data file size.
- mapperXmx is the mapper size or the amount of memory allocated to each node. Specify at least 6 GB.
- nodes is the number of nodes requested to form the cluster.
- output is the name of the directory created each time a H2O cloud is created so it is necessary for the name to be unique each time it is launched.
To monitor your job, direct your web browser to your standard job tracker Web UI. To access H2O’s Web UI, direct your web browser to one of the launched instances. If you are unsure where your JVM is launched, review the output from your command after the nodes has clouded up and formed a cluster. Any of the nodes’ IP addresses will work as there is no master node.
Determining driver host interface for mapper->driver callback...
[Possible callback IP address: 172.16.2.181]
[Possible callback IP address: 127.0.0.1]
...
Waiting for H2O cluster to come up...
H2O node 172.16.2.184:54321 requested flatfile
Sending flatfiles to nodes...
 [Sending flatfile to node 172.16.2.184:54321]
H2O node 172.16.2.184:54321 reports H2O cluster size 1
H2O cluster (1 nodes) is up
Blocking until the H2O cluster shuts down...
Hadoop Launch Parameters
-h | -help: Display help-jobname <JobName>: Specify a job name for the Jobtracker to use; the default isH2O_nnnnn(where n is chosen randomly)-principal <kerberos principal> -keytab <keytab path> | -run_as_user <hadoop username>: Optionally specify a Kerberos principal and keytab or specify therun_as_userparameter to start clusters on behalf of the user/principal. Note that usingrun_as_userimplies that the Hadoop cluster does not have Kerberos.-driverif <IP address of mapper -> driver callback interface>: Specify the IP address for callback messages from the mapper to the driver.-driverport <port of mapper -> callback interface>: Specify the port number for callback messages from the mapper to the driver.-driverportrange <range portX-portY of mapper-> callback interface>: Specify the allowed port range of the driver callback interface, eg. 50000-55000.-network <IPv4Network1>[,<IPv4Network2>]: Specify the IPv4 network(s) to bind to the H2O nodes; multiple networks can be specified to force H2O to use the specified host in the Hadoop cluster.10.1.2.0/24allows 256 possibilities.-timeout <seconds>: Specify the timeout duration (in seconds) to wait for the cluster to form before failing. Note: The default value is 120 seconds; if your cluster is very busy, this may not provide enough time for the nodes to launch. If H2O does not launch, try increasing this value (for example,-timeout 600).-disown: Exit the driver after the cluster forms.Note: For Qubole users who include the
-disownflag, if your cluster is dying right after launch, add-Dmapred.jobclient.killjob.onexit=falseas a launch parameter.-notify <notification file name>: Specify a file to write when the cluster is up. The file contains the IP and port of the embedded web server for one of the nodes in the cluster. All mappers must start before the H2O cloud is considered “up”.-mapperXmx <per mapper Java Xmx heap size>: Specify the amount of memory to allocate to H2O (at least 6g).-extramempercent <0-20>: Specify the extra memory for internal JVM use outside of the Java heap. This is a percentage ofmapperXmx.-n | -nodes <number of H2O nodes>: Specify the number of nodes.-nthreads <maximum number of CPUs>: Specify the number of CPUs to use. This defaults to using all CPUs on the host, or you can enter a positive integer.-baseport <initialization port for H2O nodes>: Specify the initialization port for the H2O nodes. The default is54321.-ea: Enable assertions to verify boolean expressions for error detection.-verbose:gc: Include heap and garbage collection information in the logs.-XX:+PrintGCDetails: Include a short message after each garbage collection.-license <license file name>: Specify the directory of local filesytem location and the license file name.-o | -output <HDFS output directory>: Specify the HDFS directory for the output.-flow_dir <Saved Flows directory>: Specify the directory for saved flows. By default, H2O will try to find the HDFS home directory to use as the directory for flows. If the HDFS home directory is not found, flows cannot be saved unless a directory is specified using-flow_dir.
Accessing S3 Data from Hadoop
H2O launched on Hadoop can access S3 Data in addition to to HDFS. To enable access, follow the instructions below.
Edit Hadoop’s core-site.xml, then set the HADOOP_CONF_DIR environment property to the directory containing the core-site.xml file. For an example core-site.xml file, refer to Core-site.xml Example. Typically, the configuration directory for most Hadoop distributions is /etc/hadoop/conf.
You can also pass the S3 credentials when launching H2O with the Hadoop jar command. Use the -D flag to pass the credentials:
hadoop jar h2odriver.jar -Dfs.s3.awsAccessKeyId="${AWS_ACCESS_KEY}" -Dfs.s3n.awsSecretAccessKey="${AWS_SECRET_KEY}" -n 3 -mapperXmx 10g -output outputDirectory
where AWS_ACCESS_KEY represents your user name and AWS_SECRET_KEY represents your password.
Then import the data with the S3 URL path:
To import the data from the Flow API:
importFiles [ "s3n:/path/to/bucket/file/file.tab.gz" ]
To import the data from the R API:
h2o.importFile(path = "s3n://bucket/path/to/file.csv")
To import the data from the Python API:
h2o.import_frame(path = "s3n://bucket/path/to/file.csv")
YARN Best Practices
YARN (Yet Another Resource Manager) is a resource management framework. H2O can be launched as an application on YARN. If you want to run H2O on Hadoop, essentially, you are running H2O on YARN. If you are not currently using YARN to manage your cluster resources, we strongly recommend it.
Using H2O with YARN
When you launch H2O on Hadoop using the hadoop jar command, YARN allocates the necessary resources to launch the requested number of nodes. H2O launches as a MapReduce (V2) task, where each mapper is an H2O node of the specified size.
hadoop jar h2odriver.jar -nodes 1 -mapperXmx 6g -output hdfsOutputDirName
Occasionally, YARN may reject a job request. This usually occurs because either there is not enough memory to launch the job or because of an incorrect configuration.
If YARN rejects the job request, try launching the job with less memory to see if that is the cause of the failure. Specify smaller values for -mapperXmx (we recommend a minimum of 2g) and -nodes (start with 1) to confirm that H2O can launch successfully.
To resolve configuration issues, adjust the maximum memory that YARN will allow when launching each mapper. If the cluster manager settings are configured for the default maximum memory size but the memory required for the request exceeds that amount, YARN will not launch and H2O will time out. If you are using the default configuration, change the configuration settings in your cluster manager to specify memory allocation when launching mapper tasks. To calculate the amount of memory required for a successful launch, use the following formula:
YARN container size (mapreduce.map.memory.mb) =-mapperXmxvalue + (-mapperXmx*-extramempercent[default is 10%])
The mapreduce.map.memory.mb value must be less than the YARN memory configuration values for the launch to succeed.
Configuring YARN
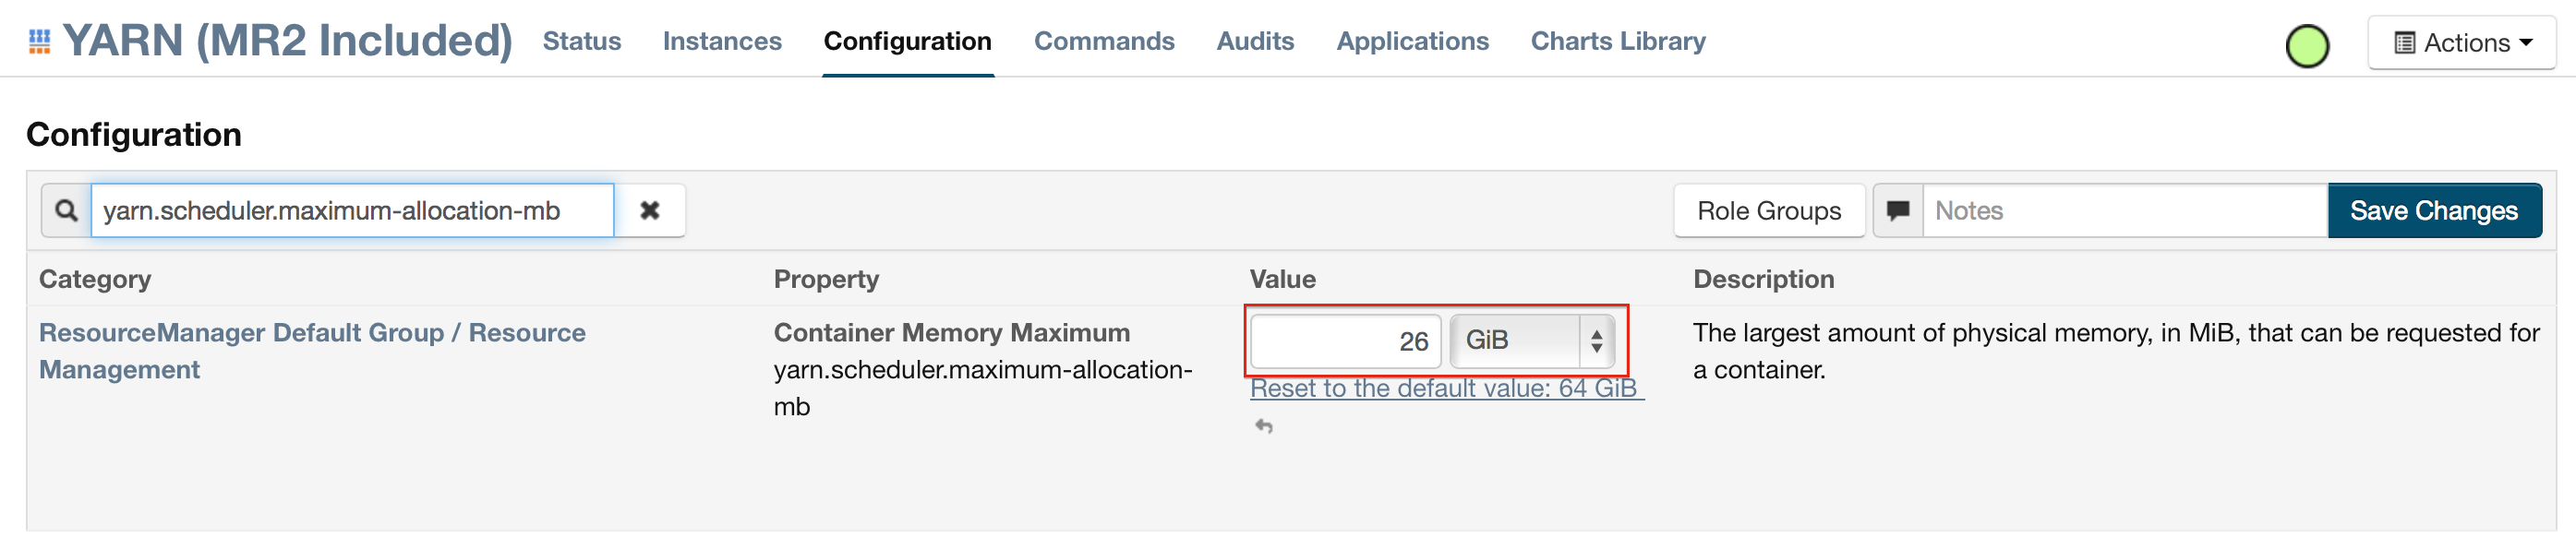
For Cloudera, configure the settings in Cloudera Manager. Depending on how the cluster is configured, you may need to change the settings for more than one role group.
Click Configuration and enter the following search term in quotes: yarn.nodemanager.resource.memory-mb.
Enter the amount of memory (in GB) to allocate in the Value field. If more than one group is listed, change the values for all listed groups.

Click the Save Changes button in the upper-right corner.
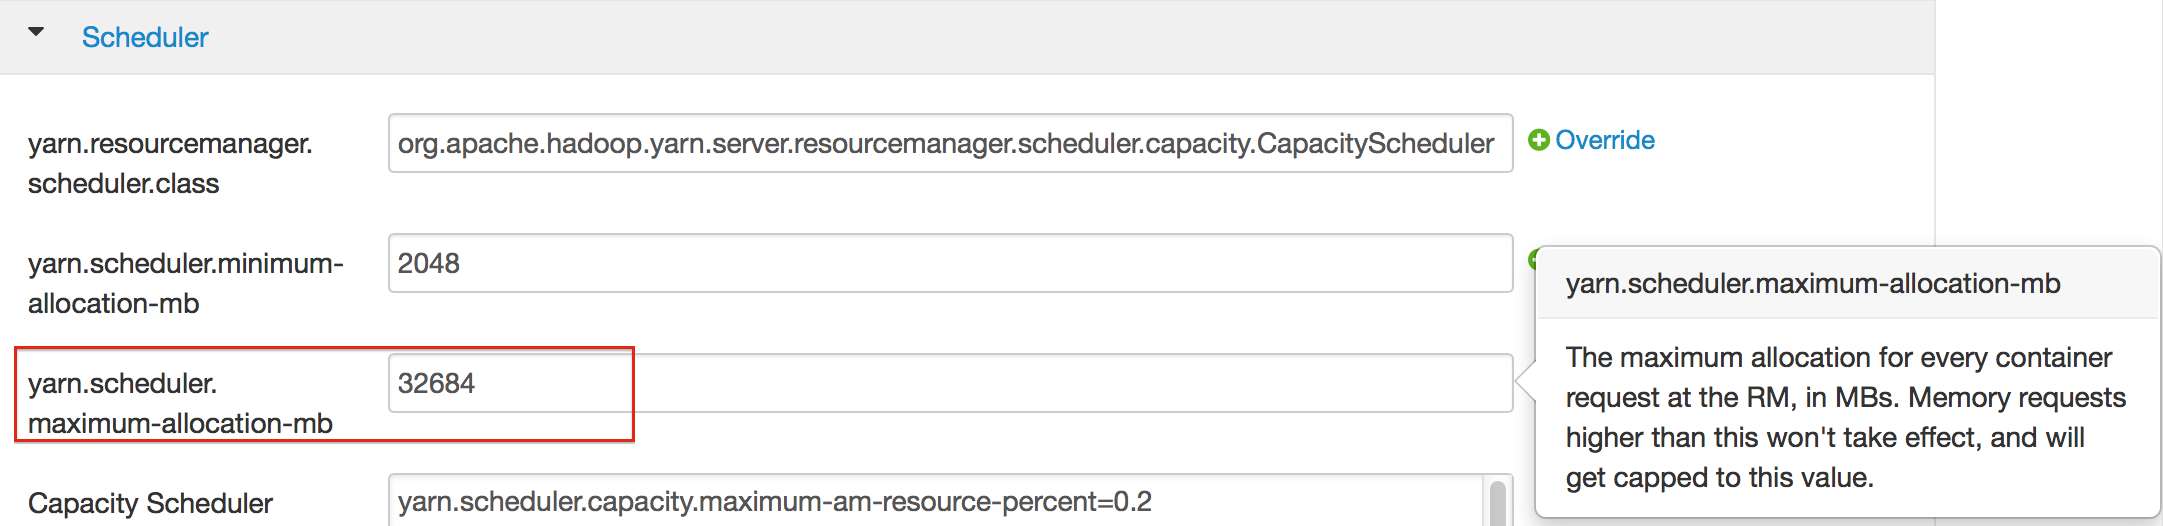
Enter the following search term in quotes: yarn.scheduler.maximum-allocation-mb
Change the value, click the Save Changes button in the upper-right corner, and redeploy.
For Hortonworks, configure the settings in Ambari.
- Select YARN, then click the Configs tab.
- Select the group.
- In the Node Manager section, enter the amount of memory (in MB) to allocate in the yarn.nodemanager.resource.memory-mb entry field.

- In the Scheduler section, enter the amount of memory (in MB) to allocate in the yarn.scheduler.maximum-allocation-mb entry field.
- Click the Save button at the bottom of the page and redeploy the cluster.
For MapR:
- Edit the yarn-site.xml file for the node running the ResourceManager.
- Change the values for the
yarn.nodemanager.resource.memory-mbandyarn.scheduler.maximum-allocation-mbproperties. - Restart the ResourceManager and redeploy the cluster.
To verify the values were changed, check the values for the following properties:
- <name>yarn.nodemanager.resource.memory-mb</name>
- <name>yarn.scheduler.maximum-allocation-mb</name>
Limiting CPU Usage
To limit the number of CPUs used by H2O, use the -nthreads option and specify the maximum number of CPUs for a single container to use. The following example limits the number of CPUs to four:
hadoop jar h2odriver.jar -nthreads 4 -nodes 1 -mapperXmx 6g -output hdfsOutputDirName
Note: The default is 4*the number of CPUs. You must specify at least four CPUs; otherwise, the following error message displays: ERROR: nthreads invalid (must be >= 4)
Specifying Queues
If you do not specify a queue when launching H2O, H2O jobs are submitted to the default queue. Jobs submitted to the default queue have a lower priority than jobs submitted to a specific queue.
To specify a queue with Hadoop, enter -Dmapreduce.job.queuename=<my-h2o-queue> (where <my-h2o-queue> is the name of the queue) when launching Hadoop.
For example,
hadoop jar h2odriver.jar -Dmapreduce.job.queuename=<my-h2o-queue> -nodes <num-nodes> -mapperXmx 6g -output hdfsOutputDirName
Specifying Output Directories
To prevent overwriting multiple users’ files, each job must have a unique output directory name. Change the -output hdfsOutputDir argument (where hdfsOutputDir is the name of the directory.
Alternatively, you can delete the directory (manually or by using a script) instead of creating a unique directory each time you launch H2O.
Customizing YARN
Most of the configurable YARN variables are stored in yarn-site.xml. To prevent settings from being overridden, you can mark a config as “final.” If you change any values in yarn-site.xml, you must restart YARN to confirm the changes.
Accessing Logs
Access logs for a YARN job with the yarn logs -applicationId <application_id> command from a terminal. Note that this command must be run by the same userid as the job owner, and only after the job has finished.
Docker Users
This section describes how to use H2O on Docker and walks you through the followings steps:
- Installing Docker on Mac or Linux OS
- Creating and modifying the Dockerfile
- Building a Docker image from the Dockerfile
- Running the Docker build
- Launching H2O
- Accessing H2O from the web browser or R
Prerequisites
- Linux kernel version 3.8+ or Mac OS X 10.6+
- VirtualBox
- Latest version of Docker is installed and configured
- Docker daemon is running - enter all commands below in the Docker daemon window
- Using
Userdirectory (notroot)
Notes
- Older Linux kernel versions are known to cause kernel panics that break Docker; there are ways around it, but these should be attempted at your own risk. To check the version of your kernel, run
uname -rat the command prompt. The walkkthrough that follows has been tested on a Mac OS X 10.10.1. - The Dockerfile always pulls the latest H2O release.
- The Docker image only needs to be built once.
Walkthrough
Step 1 - Install and Launch Docker
Depending on your OS, select the appropriate installation method:
Step 2 - Create or Download Dockerfile
Note: If the following commands do not work, prepend them with sudo.
- Create a folder on the Host OS to host your Dockerfile by running:
- Next, either download or create a Dockerfile, which is a build recipe that builds the container.
Download and use our Dockerfile template by running:
cd /data/h2o-{{branch_name}}
wget https://raw.githubusercontent.com/h2oai/h2o-3/master/Dockerfile
The Dockerfile:
- obtains and updates the base image (Ubuntu 14.04)
- installs Java 7
- obtains and downloads the H2O build from H2O’s S3 repository
- exposes ports 54321 and 54322 in preparation for launching H2O on those ports
Step 3 - Build Docker image from Dockerfile
From the /data/h2o-{{branch_name}} directory, run:
docker build -t "h2o.ai/{{branch_name}}:v5" .

**Note**: ``v5`` represents the current version number.
Because it assembles all the necessary parts for the image, this process can take a few minutes.
Step 4 - Run Docker Build
On a Mac, use the argument -p 54321:54321 to expressly map the port 54321. This is not necessary on Linux.
docker run -ti -p 54321:54321 h2o.ai/{{branch_name}}:v5 /bin/bash

**Note**: ``v5`` represents the version number.
Step 5 - Launch H2O
Navigate to the /opt directory and launch H2O. Change the value of -Xmx to the amount of memory you want to allocate to the H2O instance. By default, H2O launches on port 54321.
cd /opt
java -Xmx1g -jar h2o.jar
Step 6 - Access H2O from the web browser or R
- On Linux: After H2O launches, copy and paste the IP address and port of the H2O instance into the address bar of your browser. In the following example, the IP is
172.17.0.5:54321.
03:58:25.963 main INFO WATER: Cloud of size 1 formed [/172.17.0.5:54321 (00:00:00.000)]
- On OSX: Locate the IP address of the Docker’s network (
192.168.59.103in the following examples) that bridges to your Host OS by opening a new Terminal window (not a bash for your container) and runningboot2docker ip.
$ boot2docker ip
192.168.59.103
You can also view the IP address (192.168.99.100 in the example below) by scrolling to the top of the Docker daemon window:
                        ##         .
                  ## ## ##        ==
               ## ## ## ## ##    ===
           /"""""""""""""""""\___/ ===
      ~~~ {~~ ~~~~ ~~~ ~~~~ ~~~ ~ /  ===- ~~~
           \______ o           __/
             \    \         __/
              \____\_______/


docker is configured to use the default machine with IP 192.168.99.100
For help getting started, check out the docs at https://docs.docker.com
After obtaining the IP address, point your browser to the specified ip address and port. In R, you can access the instance by installing the latest version of the H2O R package and running:
library(h2o)
dockerH2O <- h2o.init(ip = "192.168.59.103", port = 54321)